Welcome to NETO

Log in to your account, or sign up in a minute.

Already registered?Existing clients
New here? Sign upChoose your track Employer Employee / Freelancer

Get in touch

Pick whatever works for you · we're here.

Info & policies

Everything about NETO · transparent and available

NETO · Bareket I.T. Ltd.
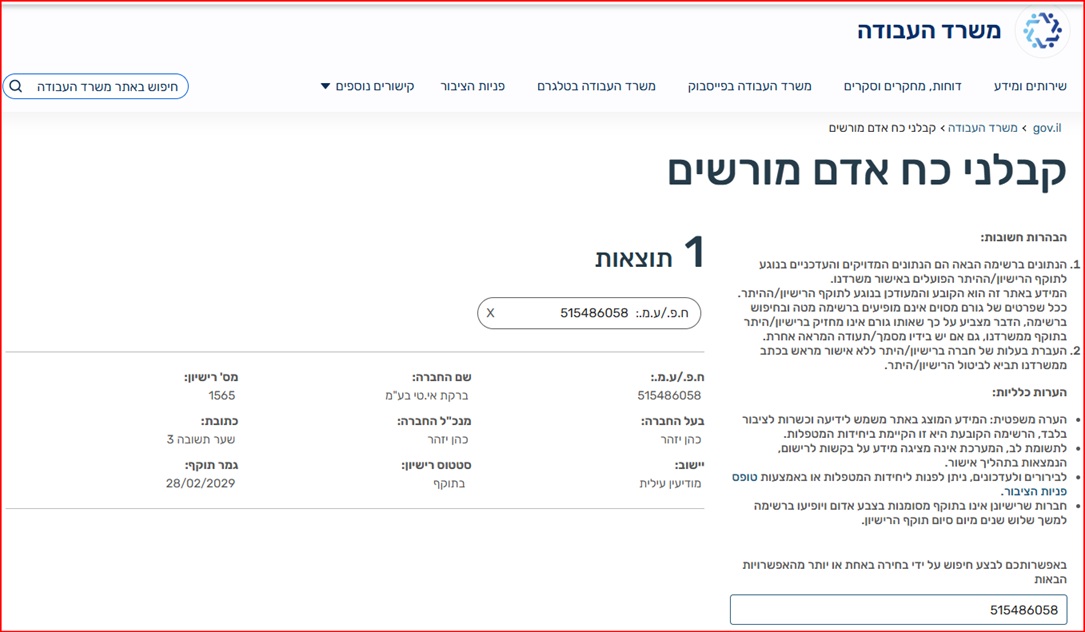
Reg. 515486058 · Licensed manpower contractor #1565
Office: Sha'arei Teshuva 31, Modi'in Illit
Tel +972-8-976-1874 · neto@neto.work

Open →

Book a demo

Pick a convenient time · we'll confirm by phone/email

Choose a day
Choose a time (11:30–15:30)
Guide progress0%
System Guides · Employer Track

Permanent Employees · Onboarding, Monthly Payroll and Documents

An employee who stays with you long-term? In the permanent track you onboard them once · and from there everything is organized: team and attendance management, one-month salary treatment with a payslip and an invoice per employee, and all tax-invoice receipts in one place. No deductions file, no dealing with the authorities.

Manpower license no. 1565 Ministry of Labor supervision Operating since 2016
No employer account yet? This track starts from an active account. First complete the employer account guide and come back here.
AI summary · the guide in 30 seconds
  • What you do here: onboard a permanent employee (scheduled to work more than two months) and manage them on an ongoing basis · candidate onboarding, team and attendance management, one-month salary treatment and tax-invoice receipts.
  • Onboard once: the onboarding screen has three tabs (employer details, candidate onboarding, candidate management), and the onboarding wizard itself runs through four stations · job details, salary and terms, cost calculation, and a finish with signatures and a guarantee invoice. Once the employee is active you see the base salary, salary cost and total cost per job.
  • Transparent monthly payroll: on the Permanent Payroll screen you move between months, mark certificates for payment and see the totals before and including VAT · a payslip and an invoice on every employee's row.
  • No legal exposure: NETO is the official employer of record under manpower license 1565 · the employee gets a lawful payslip and an employment agreement, you get a tax invoice. The commission: 5% of the invoice before VAT.
  • Everything documented: all charges and tax-invoice receipts live under Documents · including the amount breakdown and the full invoice view.

Sources: Employer account guide · Israeli Ministry of Labor · Employer costs in Israel

1
Step 1 of 8 · Entering the track

Choose the Permanent Employee Payment

On the Salary and Payments screen choose the permanent-employee payment card. This is the track for an employee scheduled to work more than two months: the system lets the employee report attendance, hands them an employment agreement and a payslip · and calculates the employment costs for you, all the way to the invoice.

Good to know: For a short job of up to two months, use the temporary worker track instead · a one-off payment wizard with no onboarding.
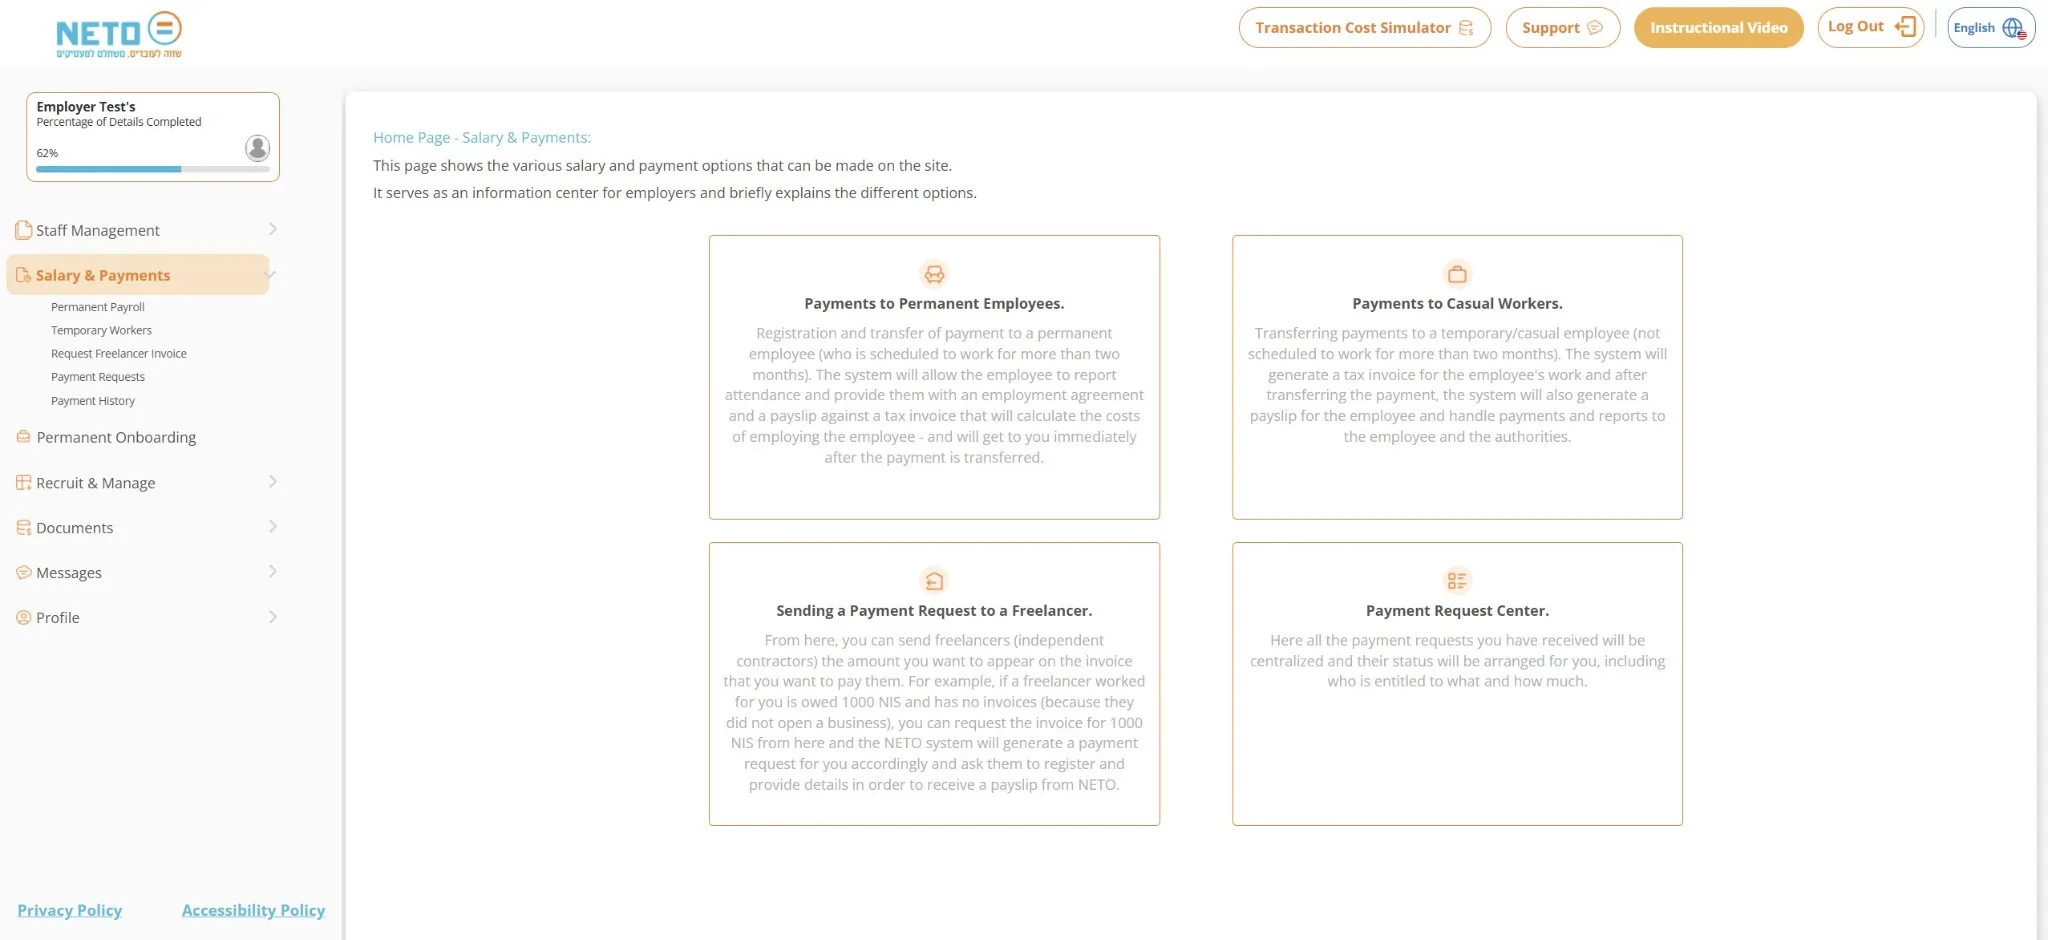
The Salary and Payments screen with the permanent employee payment card
2
Step 2 of 8 · Permanent Onboarding

The Onboarding Screen · Three Tabs, Starting with Employer Details

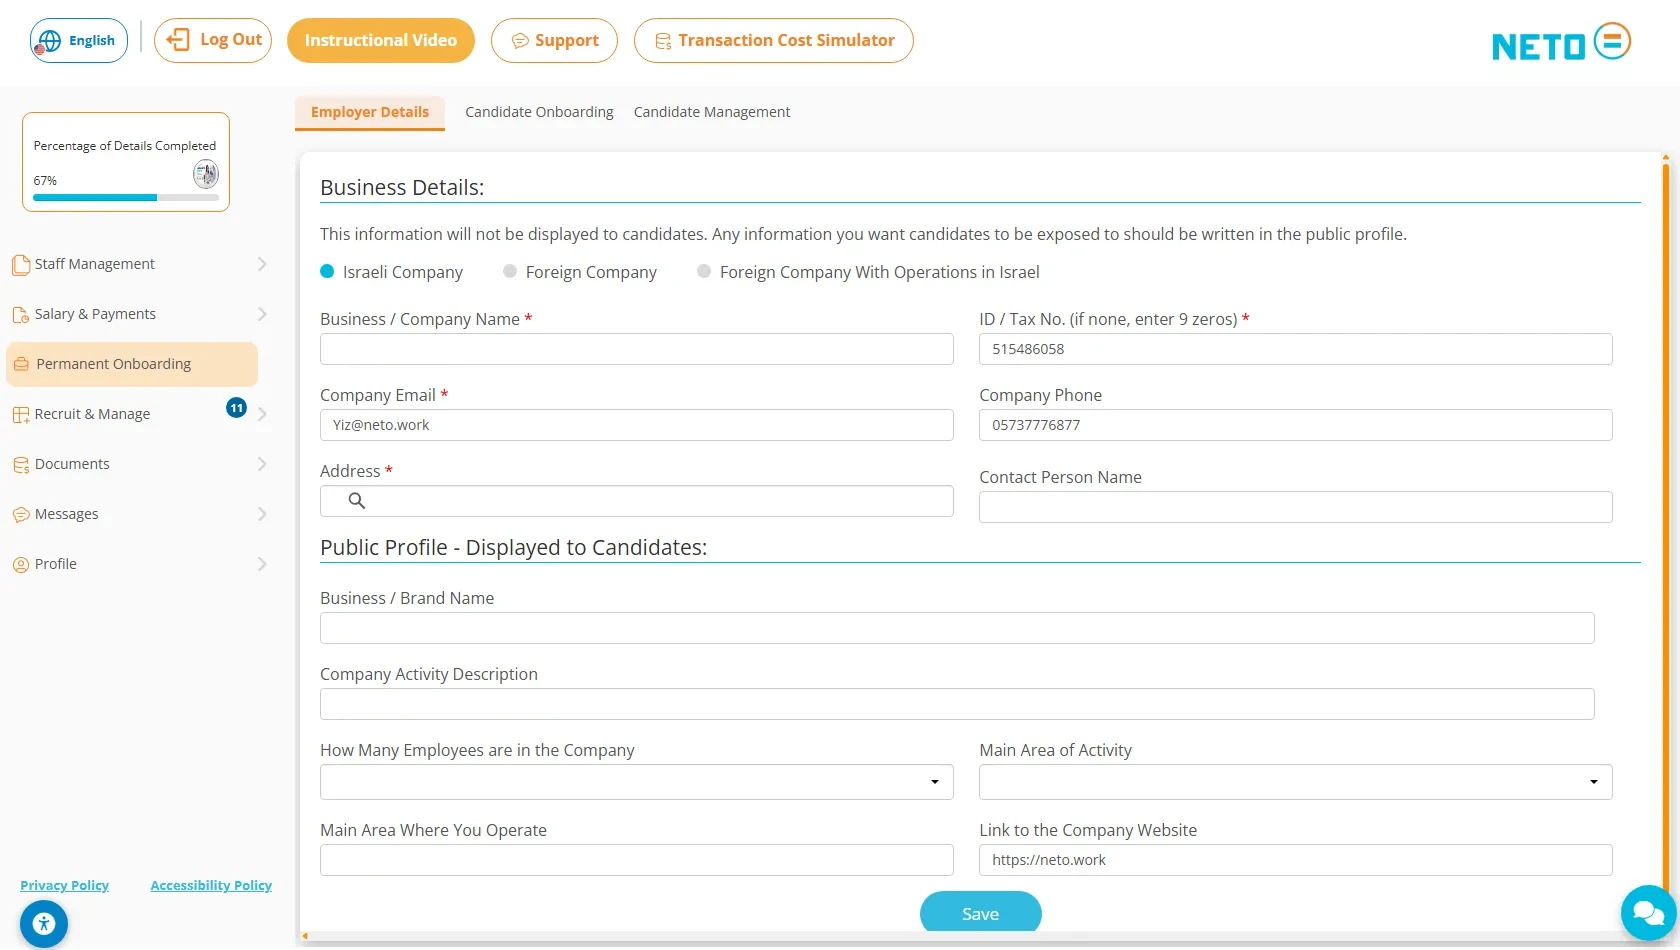
The Permanent Onboarding screen has three tabs: employer details, candidate onboarding and candidate management. Start with the employer details: the business details (company number, email, phone, address and contact person) and a public profile shown to candidates · the business or brand name, a description of the company's activity, its field, number of employees, main working area and a link to the website. Click Save when done.

Good to know: the business details themselves are not shown to candidates · only what you write in the public profile is exposed to them.

The three tabs of the onboarding screen

  • Employer details · business details and a public profile
  • Candidate onboarding · the four-station wizard
  • Candidate management · follow-up until Active worker
3
Step 3 of 8 · The onboarding wizard

Job Details, Salary and Terms · The First Two Stations

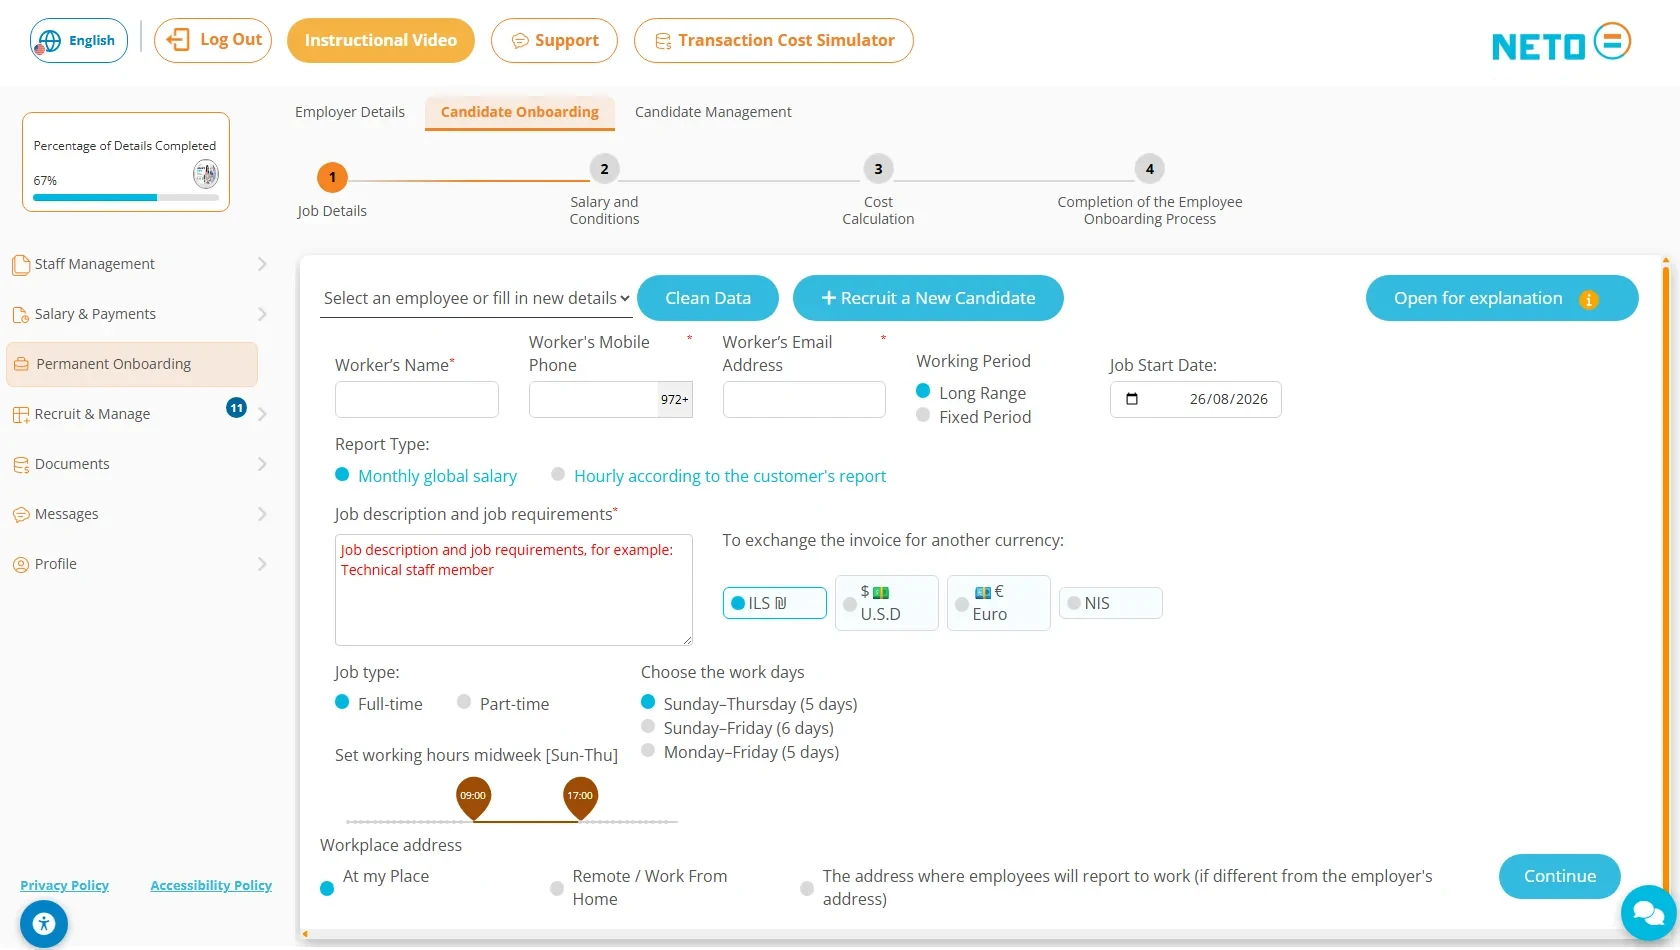
The onboarding wizard runs along a four-station progress bar: job details, salary and terms, cost calculation, and finish. In the first station choose a worker who already worked for you or enter a new candidate (name, mobile and email), set the start date and work period, the reporting type (a global monthly salary or hourly per the client's reporting), the job description and requirements, the currency, the position type and working days, the working hours and the workplace address. In the second station enter a global monthly rate or a base salary, travel costs, extra vacation days beyond the 12 set by law, the supervision type and comments · then click Calculate.

Good to know: for a global monthly salary, the on-screen guidance recommends splitting it so 70 percent counts as base salary and 30 percent as global overtime pay.

The four wizard stations

  • Job details · who, what, when and where
  • Salary and terms · rate, travel, vacation and supervision
  • Cost calculation · full breakdown and a draft payslip
  • Finish · signatures and the guarantee invoice
4
Step 4 of 8 · Cost calculation and finish

Draft Payslip, Signatures and the Guarantee Invoice

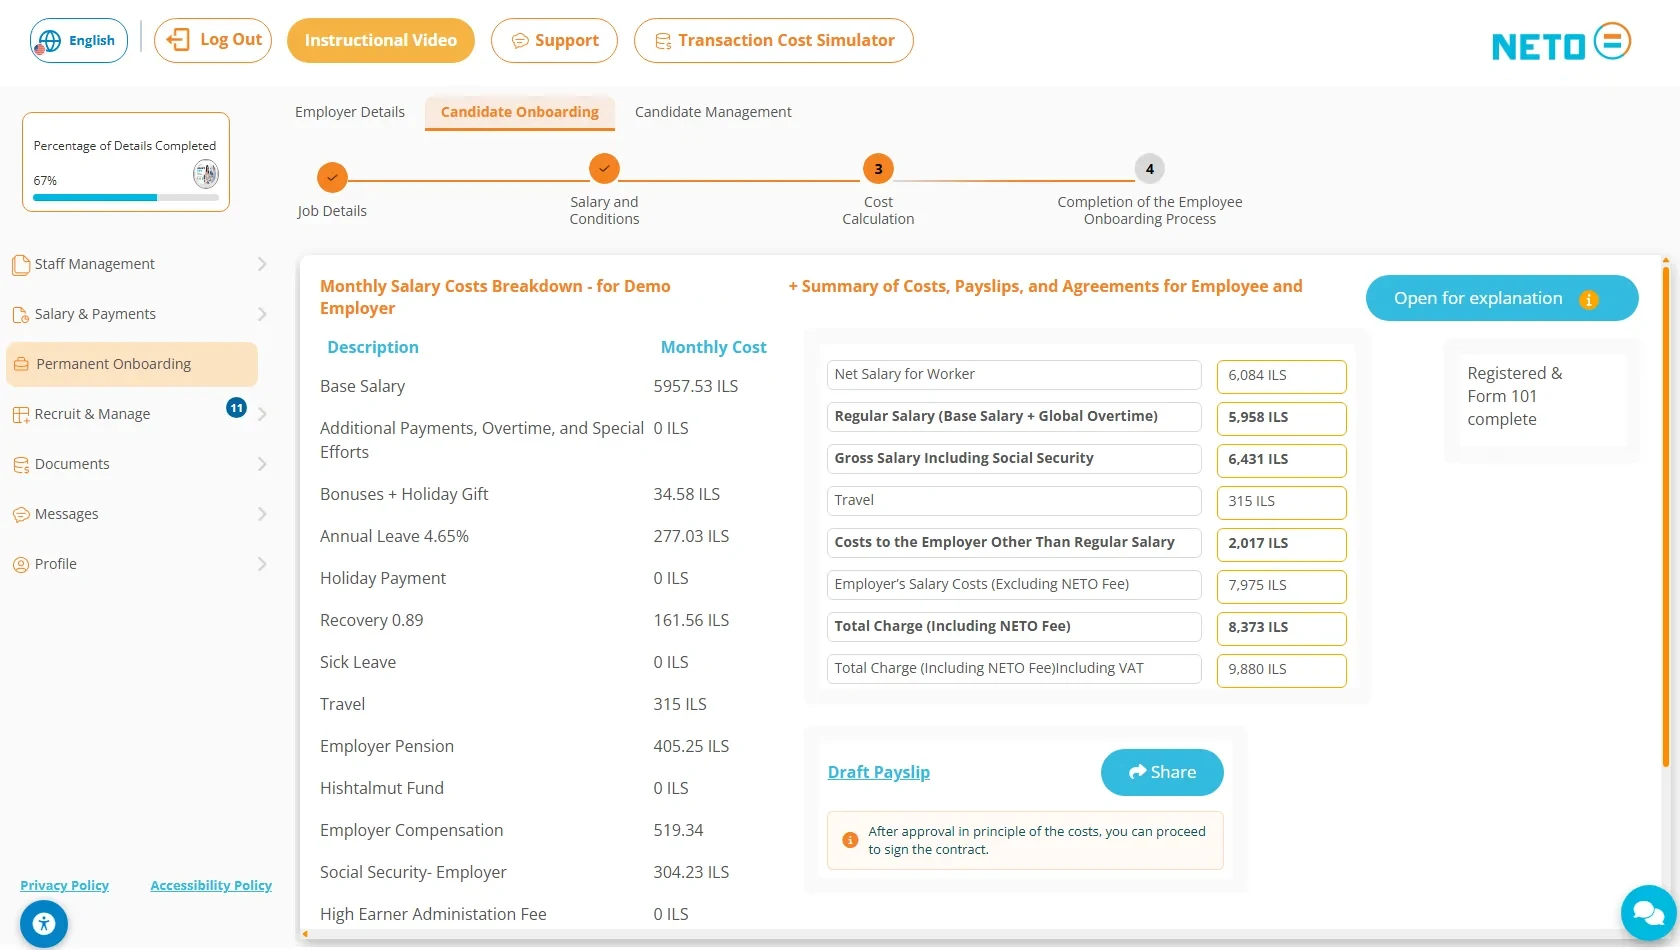
The cost-calculation station shows the full breakdown of the monthly salary costs: base salary, bonuses and holiday gift, annual vacation, convalescence pay, travel, the employer's pension and Social Security, the commission and the total cost · and you can produce and share a draft payslip. After the final approval, three actions remain to finish the onboarding: the employer's signature on the engagement contract (or sending it for a manager's signature), sending the worker the message to sign, and paying the guarantee invoice.

Good to know: the worker can sign only after you signed the employer's contract · and at any point you can view the draft agreement that will be sent to the worker, or reach support via chat.

Finishing the onboarding · three actions

  • Employer's signature on the engagement contract
  • Sending the worker the message to sign
  • Paying the guarantee invoice
5
Step 5 of 8 · Candidate management

Follow Every Candidate · Until Active Worker

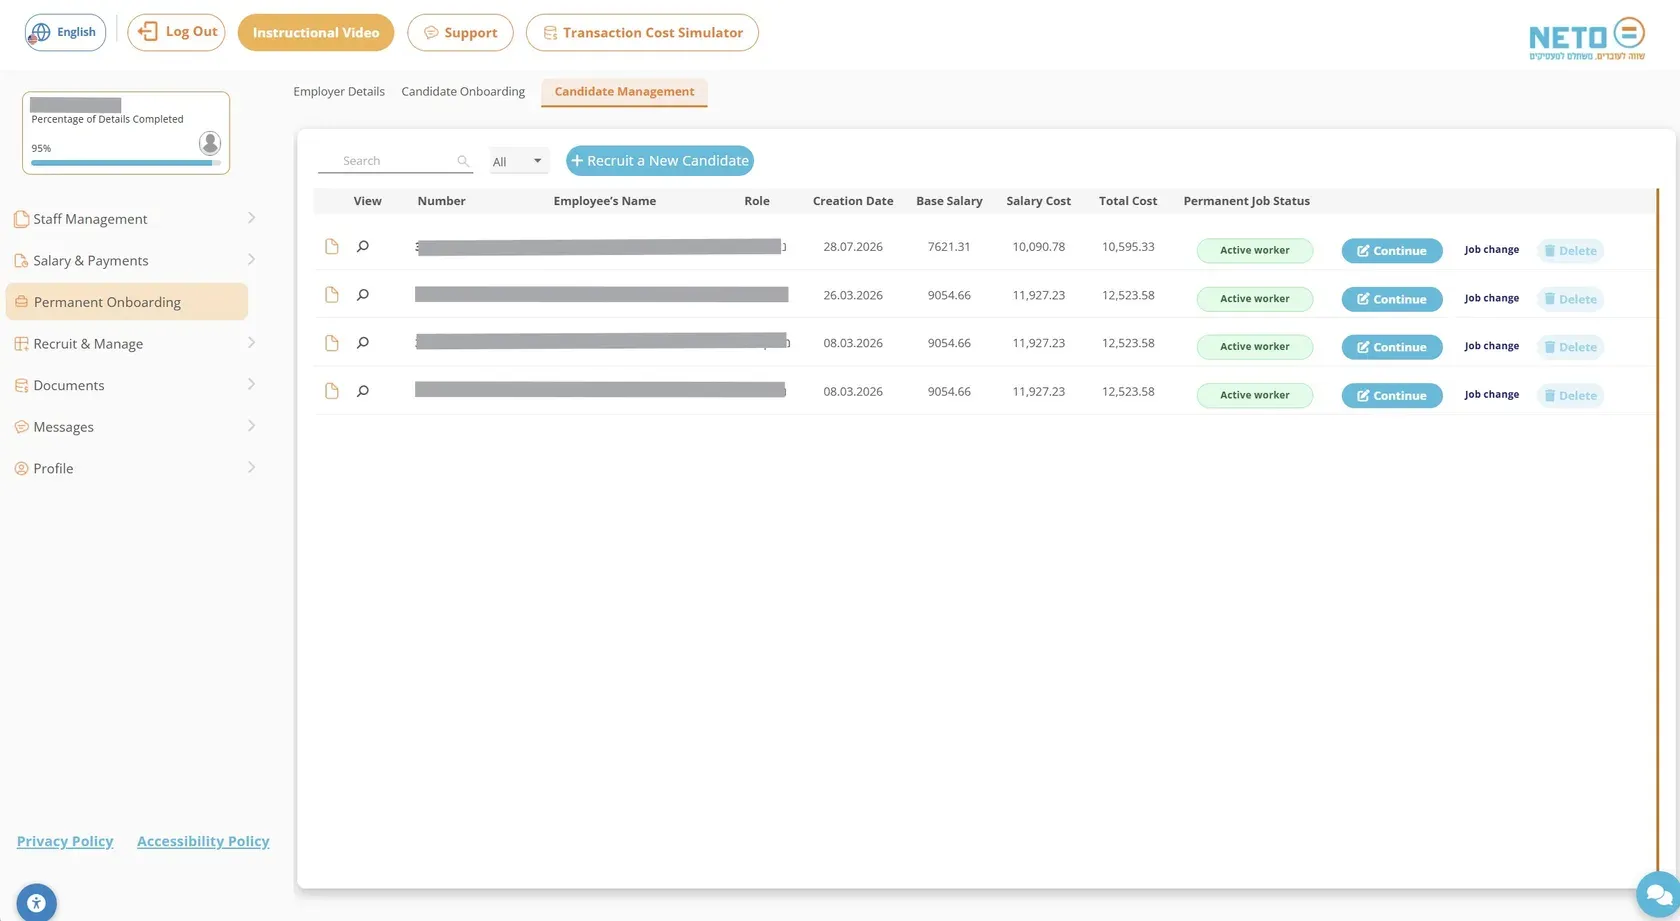
The Candidate Management tab shows everyone in one table: base salary, salary cost, total cost, creation date and status · and once a job is live the green Active worker badge appears.

Good to know: From every row you can Continue the onboarding, make a Job change or Delete a candidate · without starting over.
The Candidate Management tab with candidate and active worker rows
6
Step 6 of 8 · Staff Management

Manage Your Team · My Employees

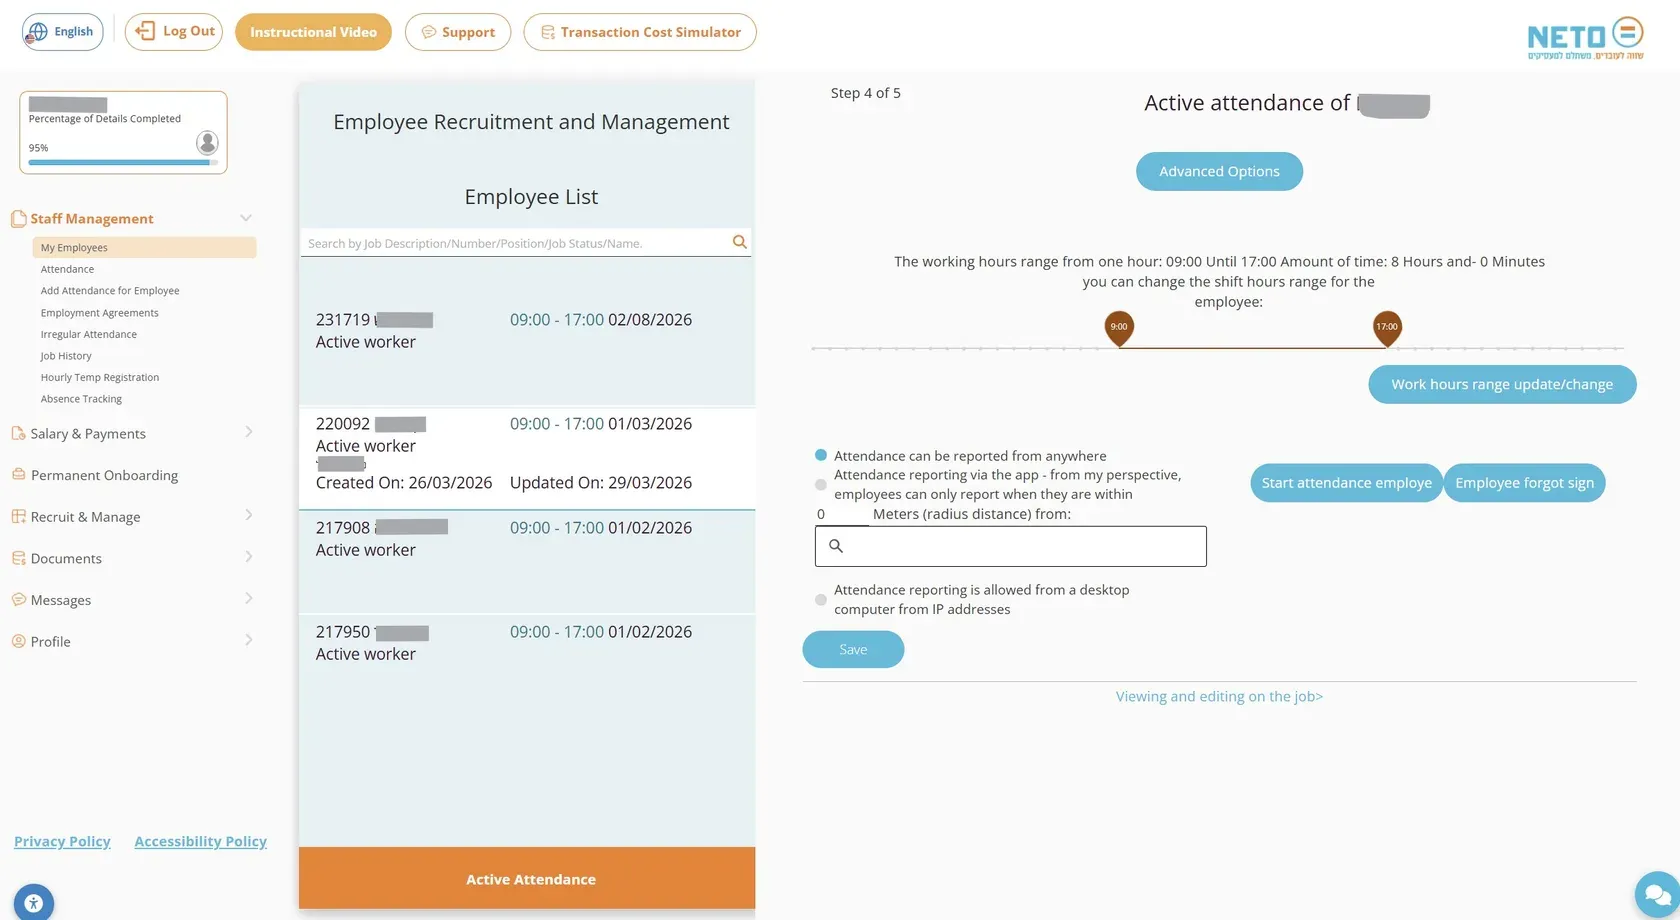
Staff Management shows the employee list with each worker's shift hours and status. For every employee you set the working-hours range and how attendance is reported: from anywhere, from the app within a defined radius, or from an office computer by IP address.

Good to know: The same screen also triggers overtime, an employee bonus, the employer-employee chat, abandonment reporting and work stoppage · all in one click.
The Staff Management screen with the employee list and active attendance panel
7
Step 7 of 8 · Salary and Payments

Handle the Salaries · Month After Month

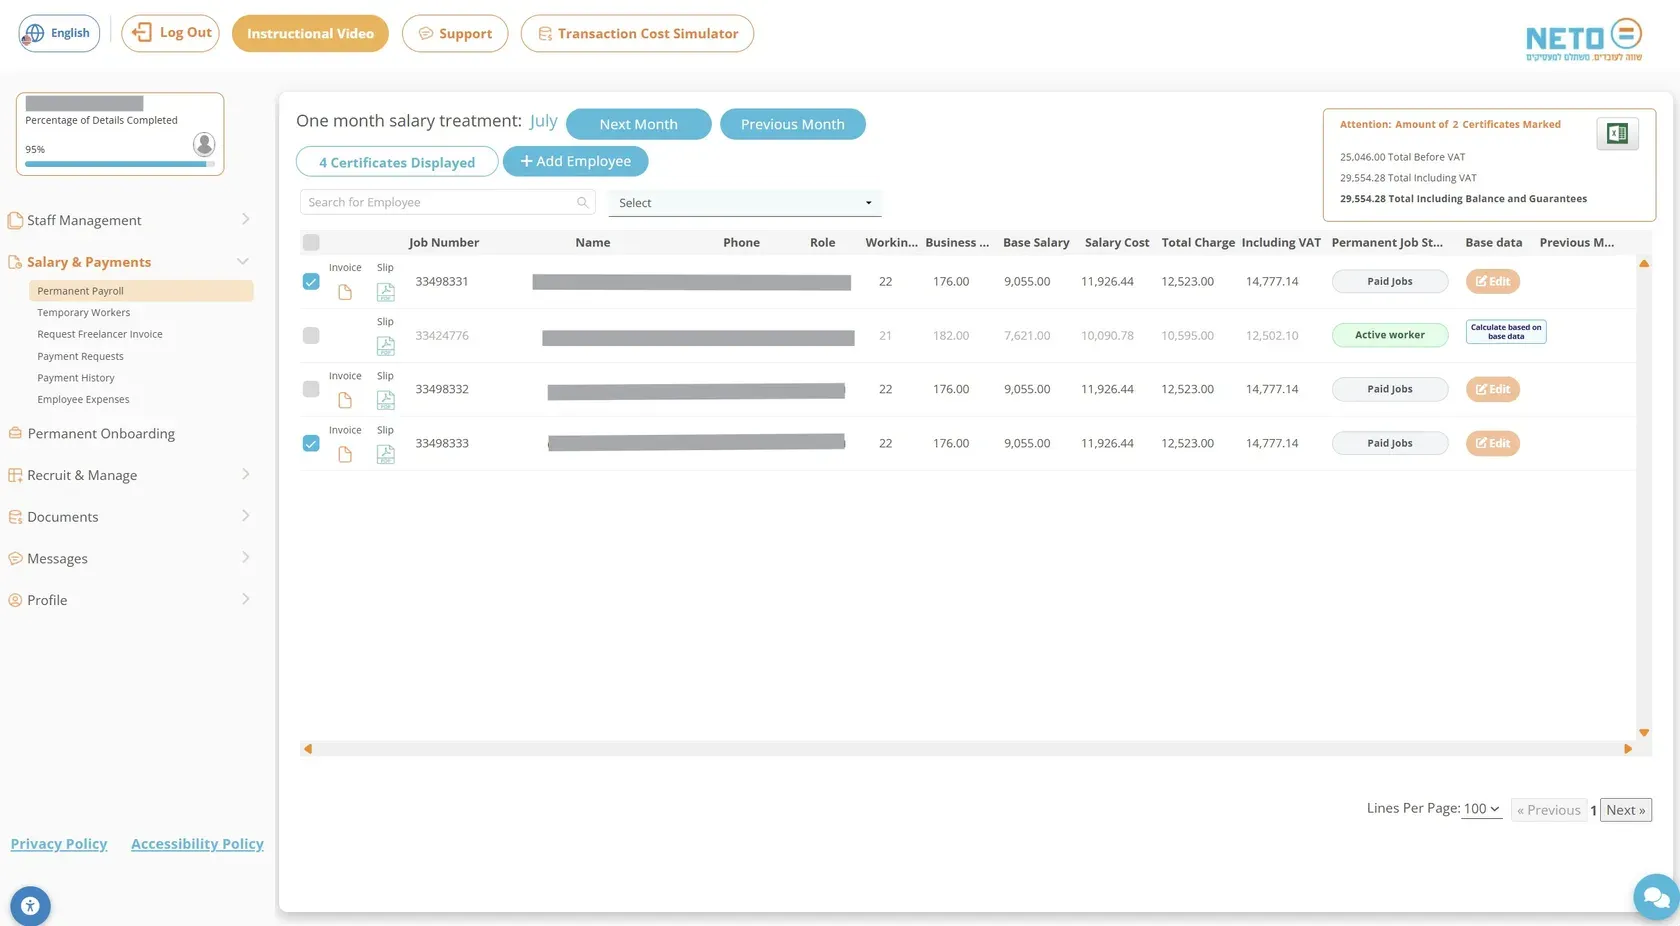
On the Permanent Payroll screen you handle each month's salary treatment: move to the next or previous month, add an employee, and mark the employee certificates for payment. Once marked, the summary box instantly shows the total before VAT, including VAT and including balance and guarantees · and you can export to Excel.

Good to know: Every employee's row carries a payslip and an invoice to download · and the Edit button updates the job's base data before the calculation.
The Permanent Payroll screen · one-month salary treatment with a payslip and invoice per employee
8
Step 8 of 8 · Documents

Tax-Invoice Receipts · Everything Documented

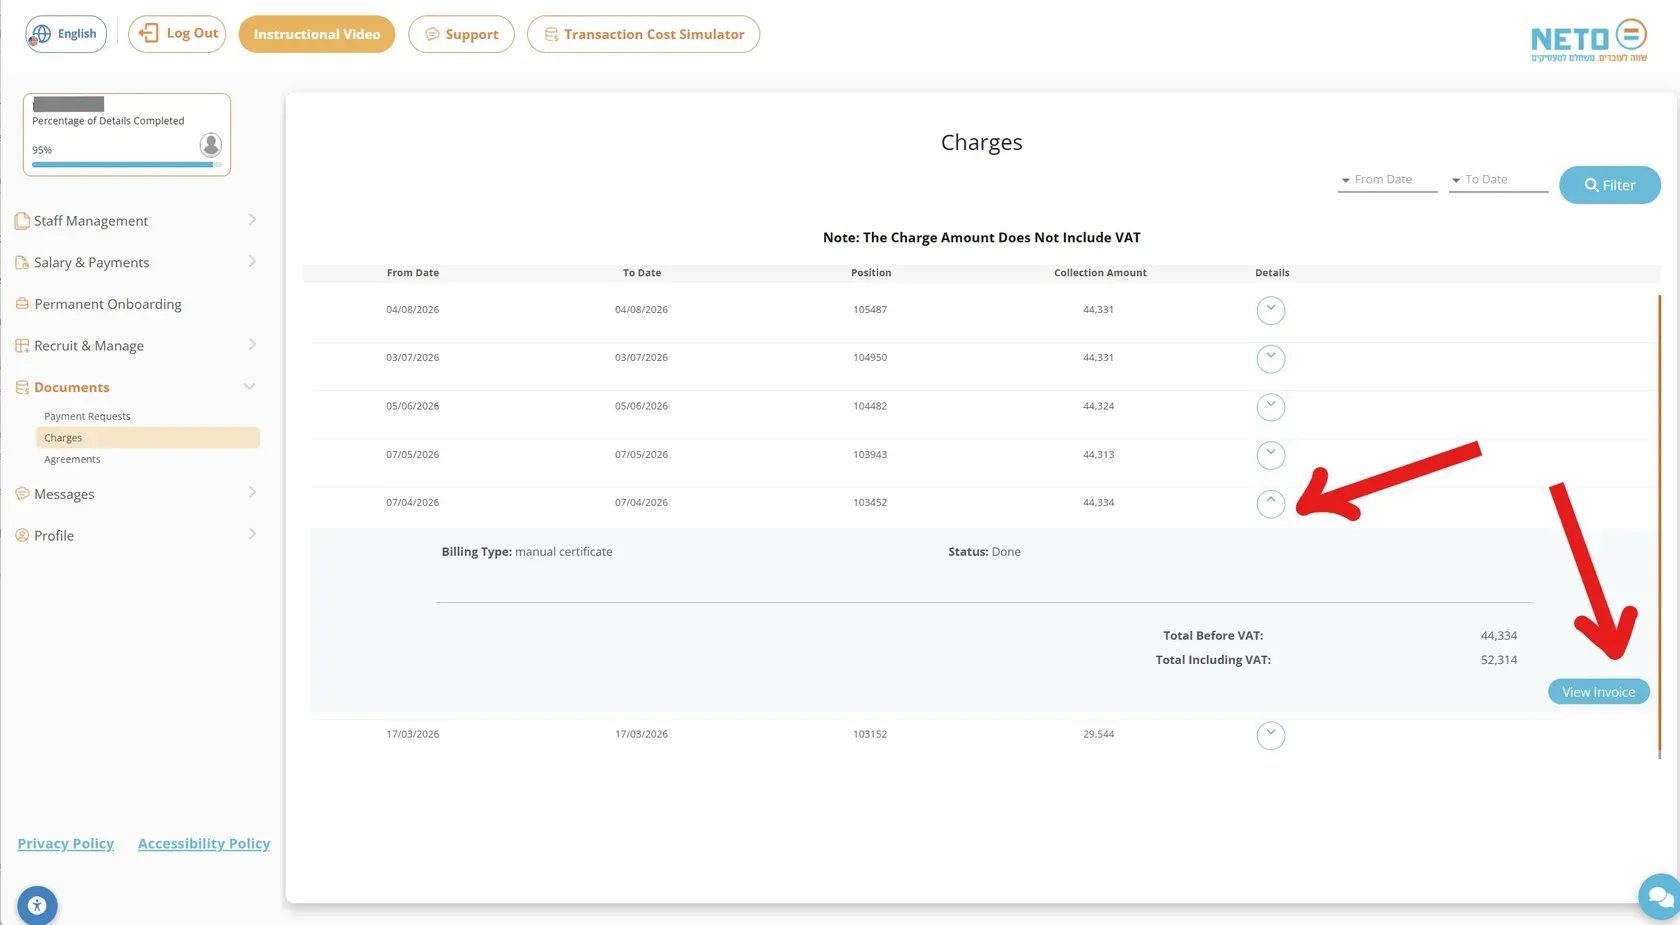
In the Documents menu, under Charges, you see the charges screen: every charge by date, position and collection amount. Clicking Details opens the billing type, the status and the totals before and including VAT · and from there View Invoice opens the full document.

Good to know: The amounts in the charges list do not include VAT · the full amount appears in the details and on the invoice itself.
The Charges screen · tax-invoice receipts with details and View Invoice

Prefer to watch it? One minute and it's clear

A narrated English video walking through the track end to end.

Related Guides · by what you need next

Track FAQ

Who is the permanent employee track for?
For an employee scheduled to work for you for more than two months, in ongoing monthly employment. NETO is the official employer of record under manpower license 1565: the employee receives a lawful payslip and an employment agreement, and you receive a tax invoice · no deductions file needed.
What is the difference between a permanent and a temporary worker?
The temporary worker track is for jobs of up to two months and runs as a one-off payment wizard. In the permanent track you onboard the employee once, they report attendance on an ongoing basis, and the salary is handled every month on the Permanent Payroll screen.
How does the monthly payment for permanent employees work?
On the Permanent Payroll screen you move between months, mark the employee certificates for payment and see the totals transparently, before and including VAT. Every employee's row carries a payslip and an invoice, and the commission is 5% of the invoice amount before VAT.
Where do I find the tax-invoice receipts?
In the Documents menu, under Charges. Every charge is listed by date, position and collection amount · clicking Details opens the totals before and including VAT and the View Invoice button. Note: the amount in the list does not include VAT.

Summary · the whole track in eight lines

  1. Open Salary and Payments and choose the permanent-employee payment card.
  2. Fill in the employer details and the public profile on the onboarding screen · then click Save.
  3. Run the onboarding wizard · job details, then salary and terms · and click Calculate.
  4. Review the cost breakdown with a draft payslip · sign the contract, send it to the worker to sign and pay the guarantee invoice.
  5. Follow every candidate in Candidate Management until the Active worker status.
  6. Manage your team in My Employees · shift hours, attendance, bonuses and chat.
  7. Handle the salaries month after month · mark certificates, with a payslip and an invoice per employee.
  8. Find every charge and tax-invoice receipt under Documents · NETO handles all the reporting to the authorities.

Still have a question? We're here

The NETO team answers fast · on WhatsApp, by phone or through the contact form.

About the author
Yizhar CohenYC
Yizhar CohenEntrepreneur · CEO and Founding Partner at NETO

I founded NETO to turn complex employment and payment processes into something simple, clear and legal for everyone. Good service starts with human understanding, combined with smart technology and personal attention.

Connect on LinkedIn
Have a question? Let's talk.
Topics